

How to use this guide
Use this guide from top to bottom when preparing an instance for members. Access controls who can get in. Members shows who is already inside or invited. Analytics shows what members are doing and asking. Notifications tell the owner or approved setup team when something needs attention.What this guide covers
- Access mode and member permissions.
- Manual invites, CSV imports, resend actions, and removals.
- Payment webhooks for paid membership access.
- Analytics and recent-query review.
- Notification configuration, trigger rules, delivery health, and delivery review.
- Team handoff and post-launch operating rhythm.
Before you begin
Decide who is allowed to manage access before changing settings. For most paid, private, or staged communities, Invite Only is the best starting access mode. Use a more open mode only when the instance is intentionally free or open to the public. Before launch, make sure the owner and approved setup team know who can:- Change access settings.
- Invite members.
- Import a CSV member list.
- Remove members.
- Connect Whop or Stripe webhooks.
- Configure notifications.
- Review analytics and recent queries.
Setup map
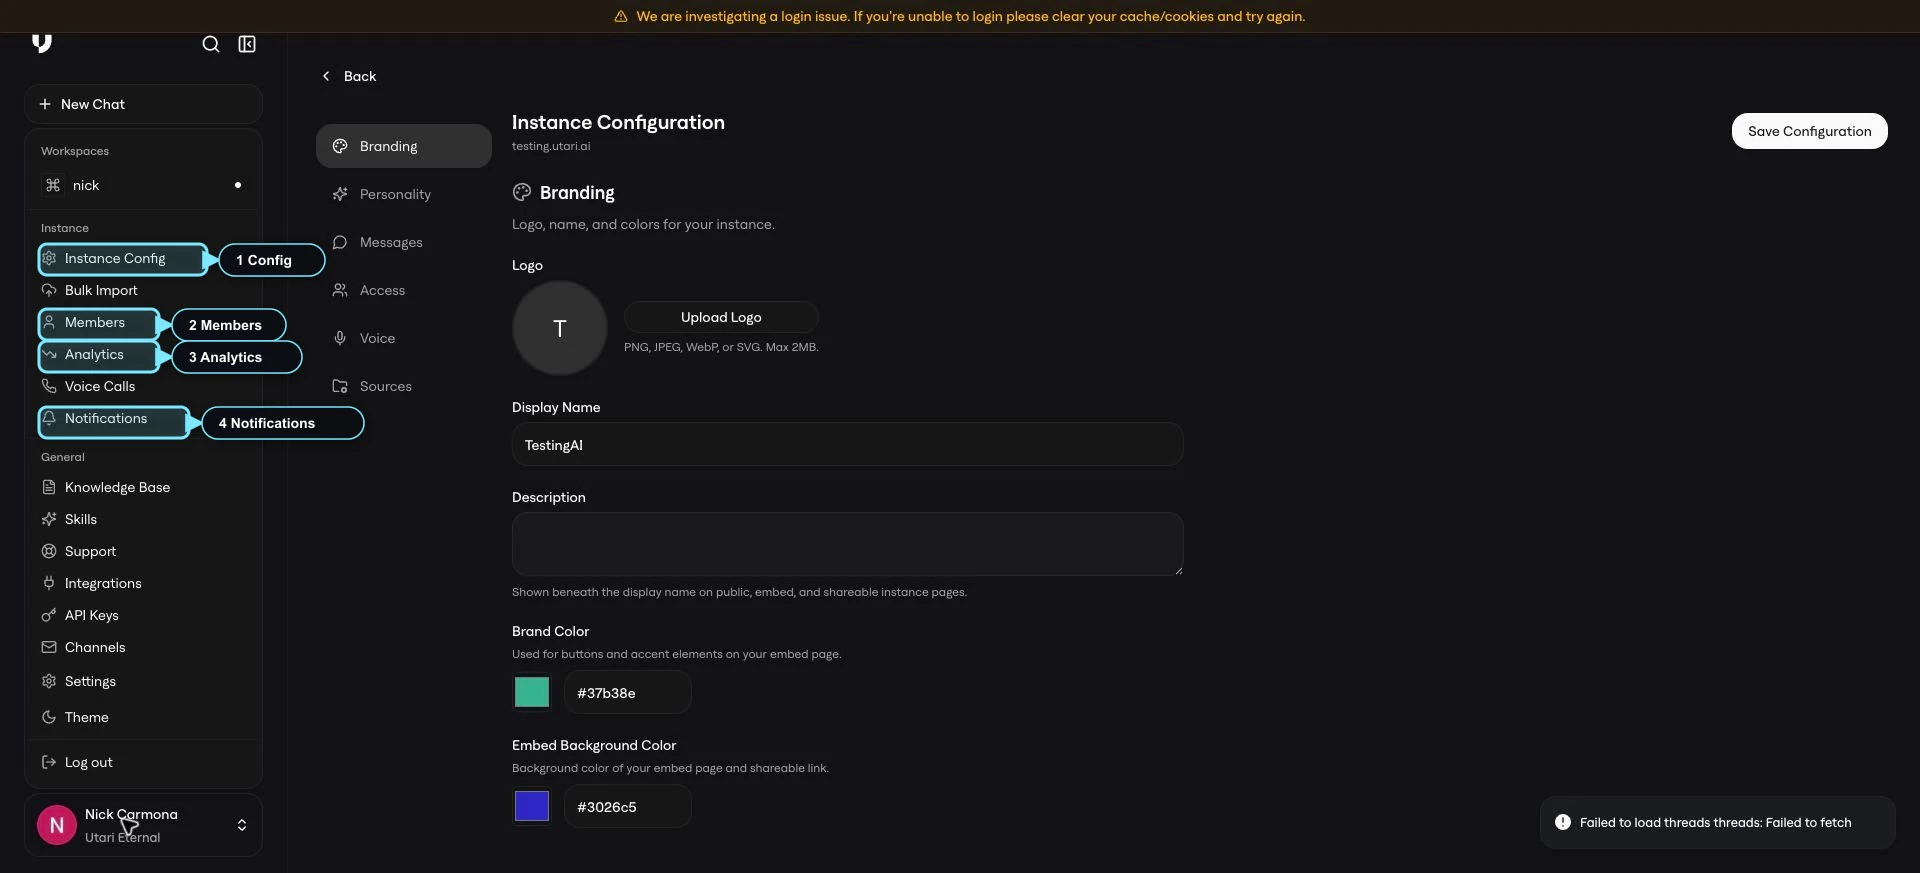
Open the profile or workspace menu at the bottom-left of the dashboard. For this guide, the important areas are Instance Config, Members, Analytics, and Notifications.- Use Instance Config for access settings.
- Use Members for invites, CSV imports, resends, removals, and payment webhooks.
- Use Analytics for usage review and recent-query review.
- Use Notifications for owner alerts and delivery review.
Access settings
Open Instance Config, then choose the Access tab. Use Access to decide who can join the instance and what members can do after they join.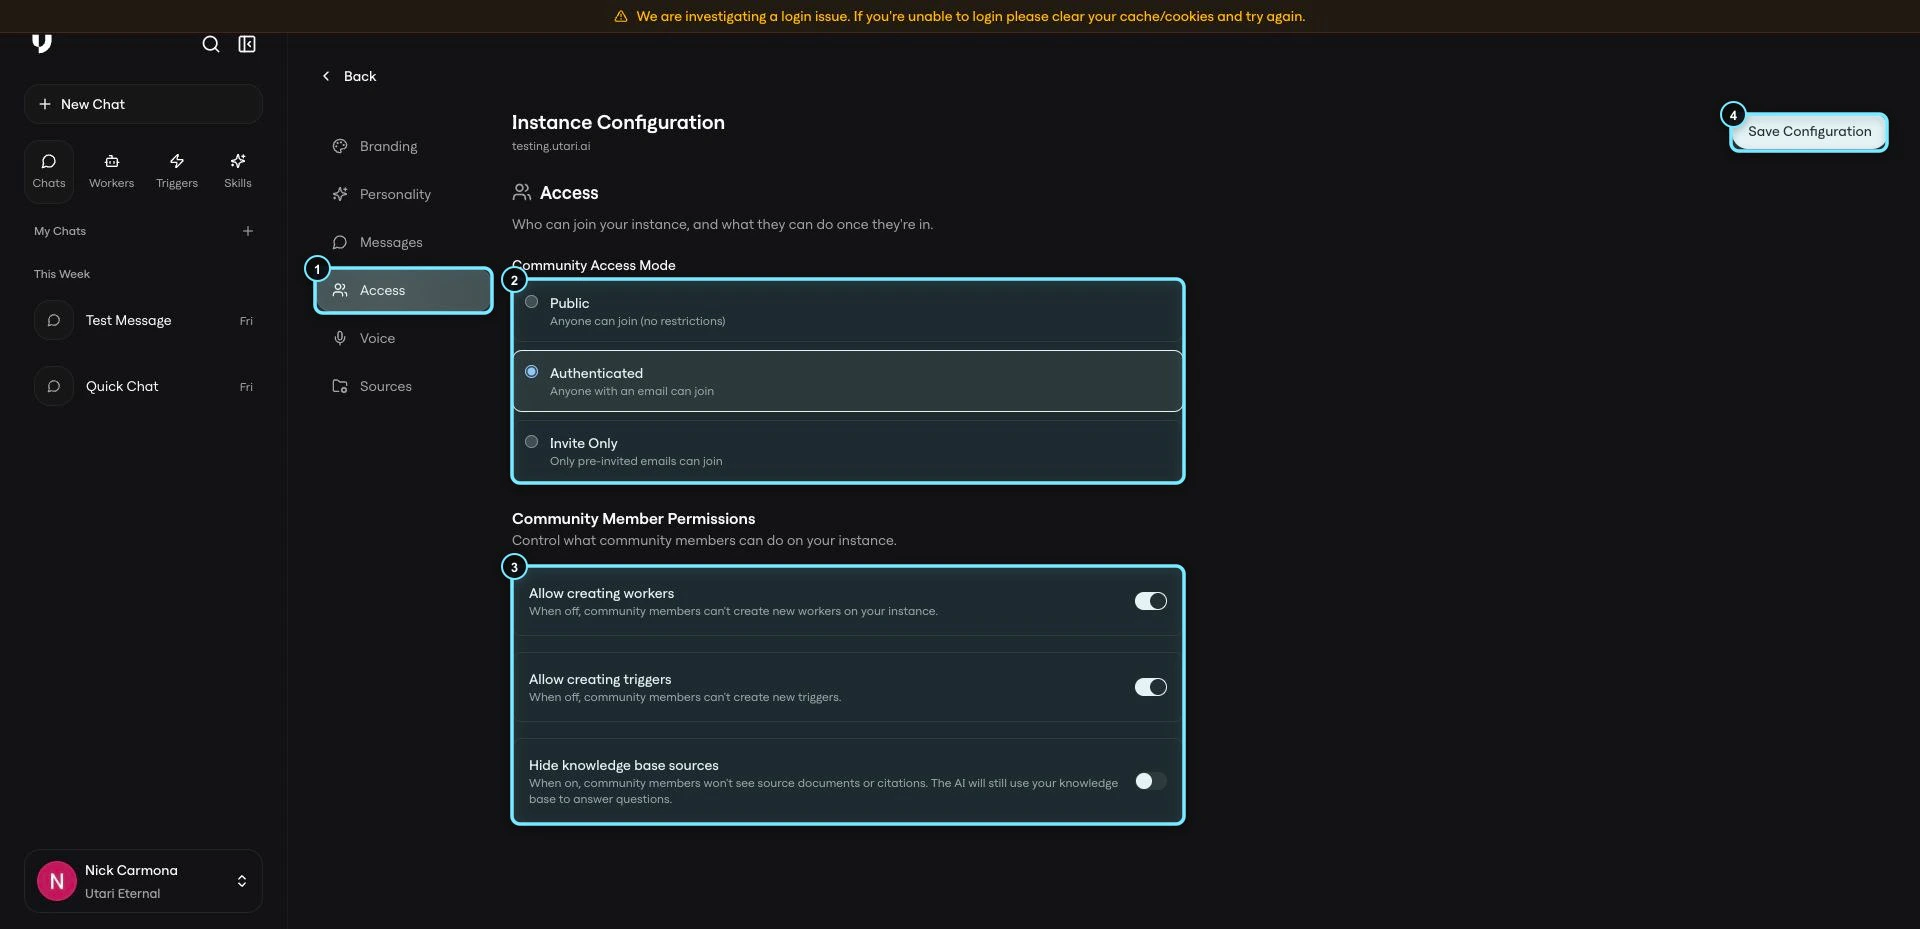
- Public: anyone can join.
- Authenticated: anyone with an email can join.
- Invite Only: only pre-invited emails can join.
- Allow creating workers
- Allow creating triggers
- Hide knowledge base sources
Members: payment webhooks and invites
Open the profile or workspace menu, then choose Members. Use Members to manage payment webhooks, one-off invites, CSV imports, member search, invite resends, and member removals.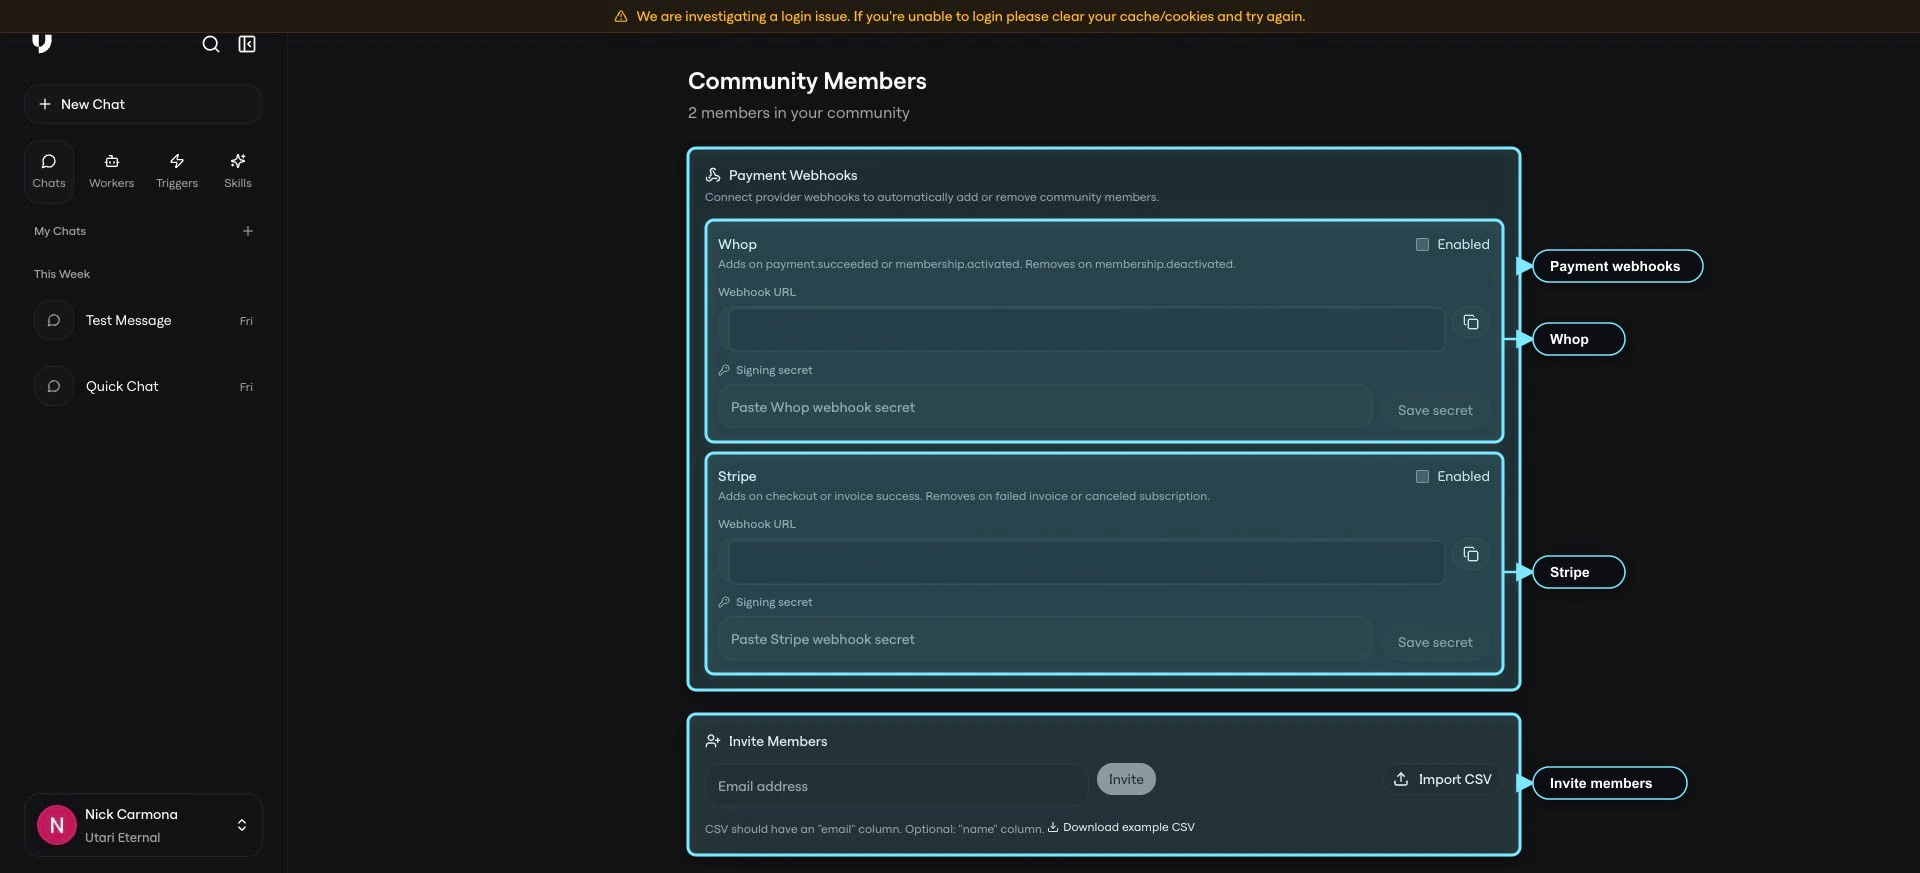
- Payment webhooks manage member access.
- App Credentials give workers or workflows permission to use connected business apps.
- Whether the provider is enabled.
- The webhook URL.
- The signing secret field.
- The Save secret action.
Members: search, resend, and remove
Use the lower Members area to search for people and manage existing member rows.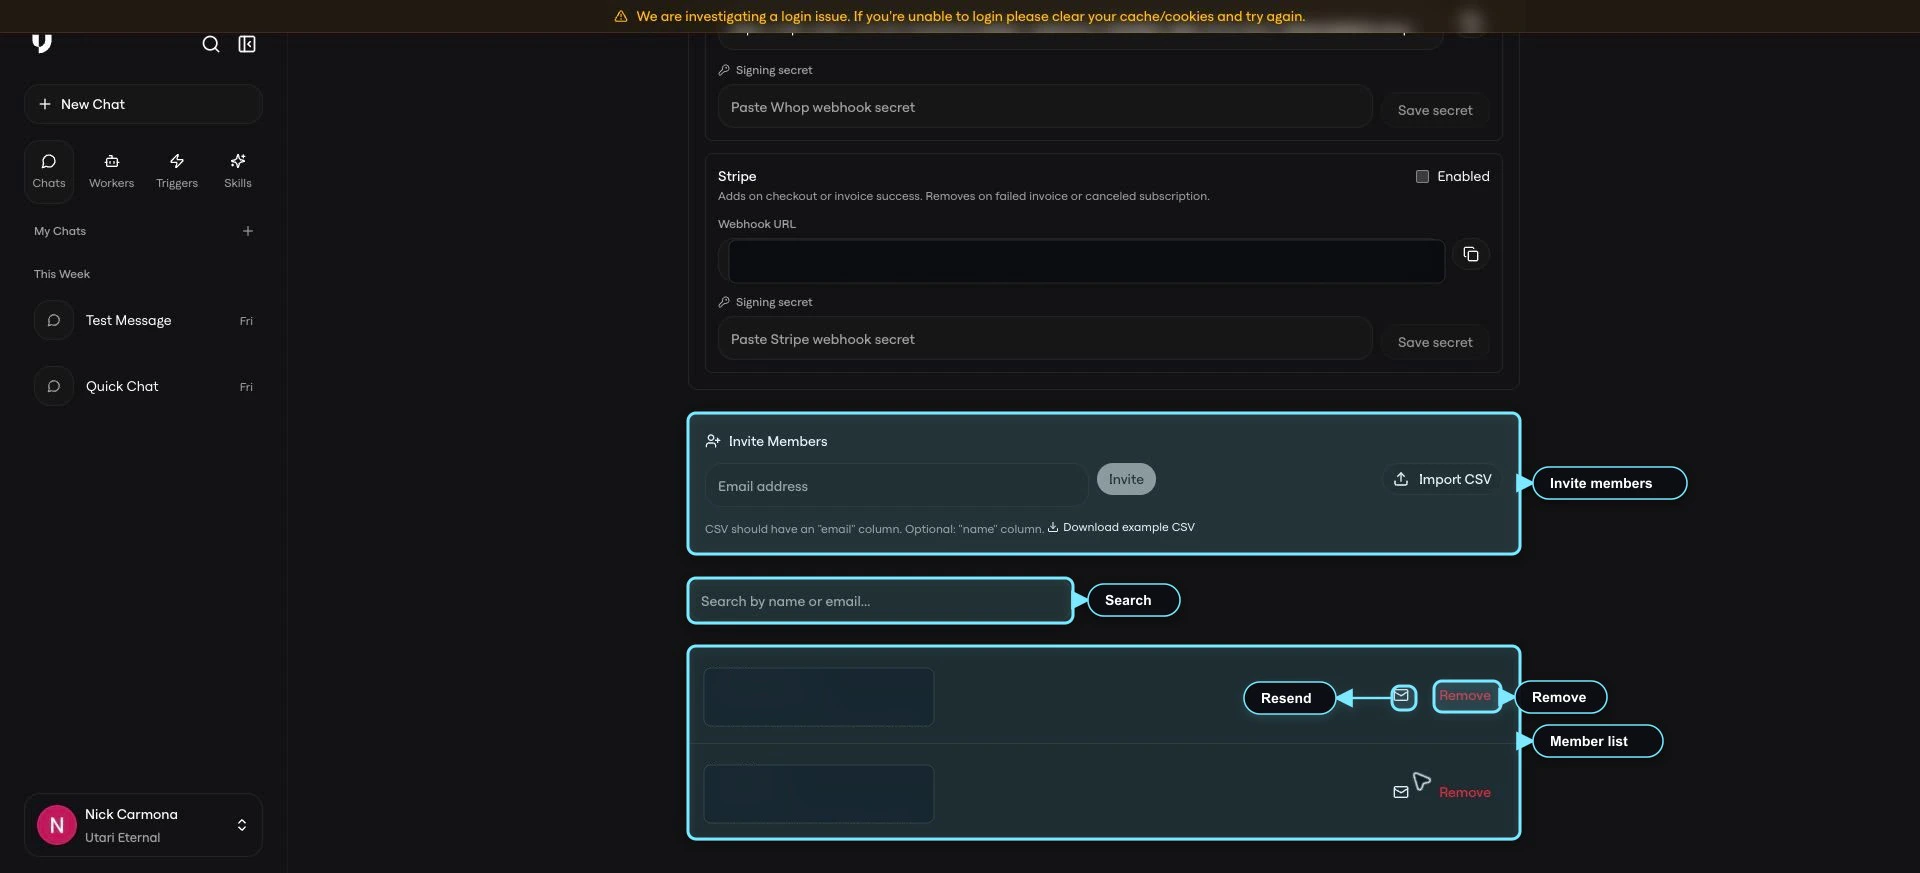
Analytics
Open the profile or workspace menu, then choose Analytics. Use Analytics to understand how the instance is being used and what members are asking.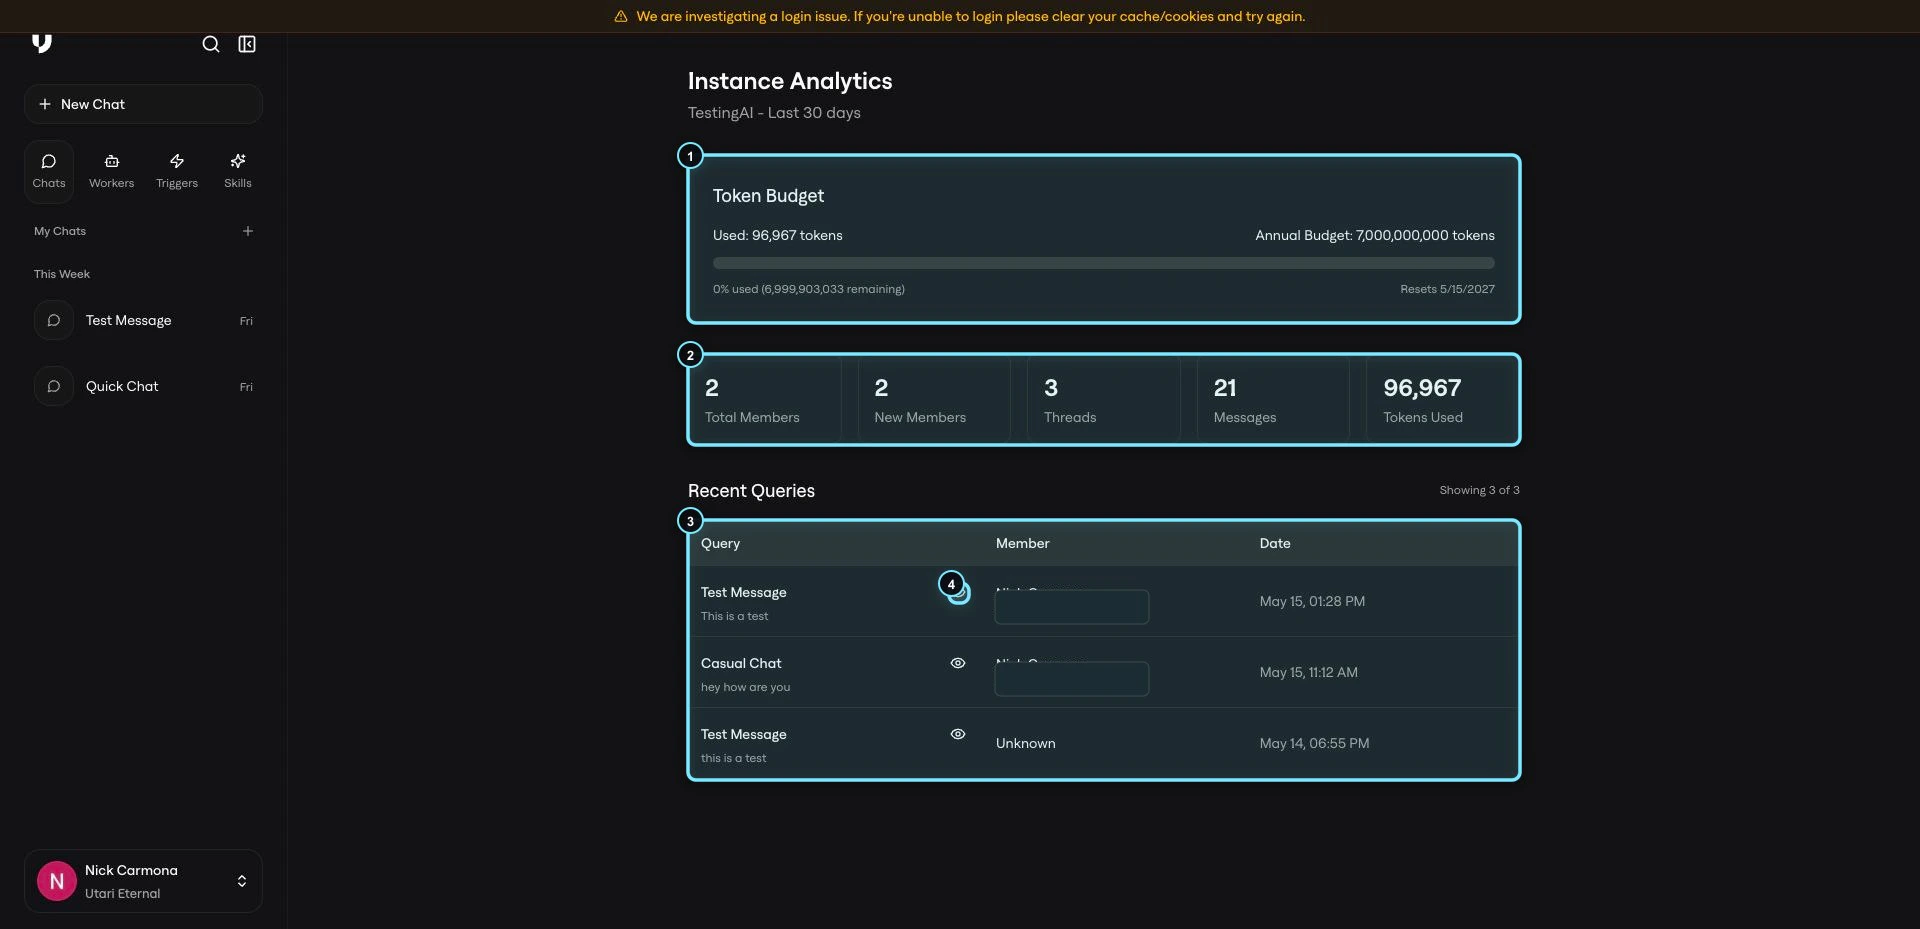
- Knowledge gaps.
- Repeated member questions.
- Confusing onboarding topics.
- Worker instructions that may need adjustment.
- High-intent members who may need follow-up.
- If the AI lacks information, update the knowledge base or connected sources.
- If the AI sounds wrong, update the personality and behavior setup.
- If members are confused about how to use the instance, update onboarding material or examples.
- If the query is about access, invites, or payment membership, review Access, Members, and payment webhooks.
- If the issue looks product-related or unclear, email hey@utari.ai.
Notifications: configuration
Open the profile or workspace menu, then choose Notifications. Start at the top of the Notifications page and work downward.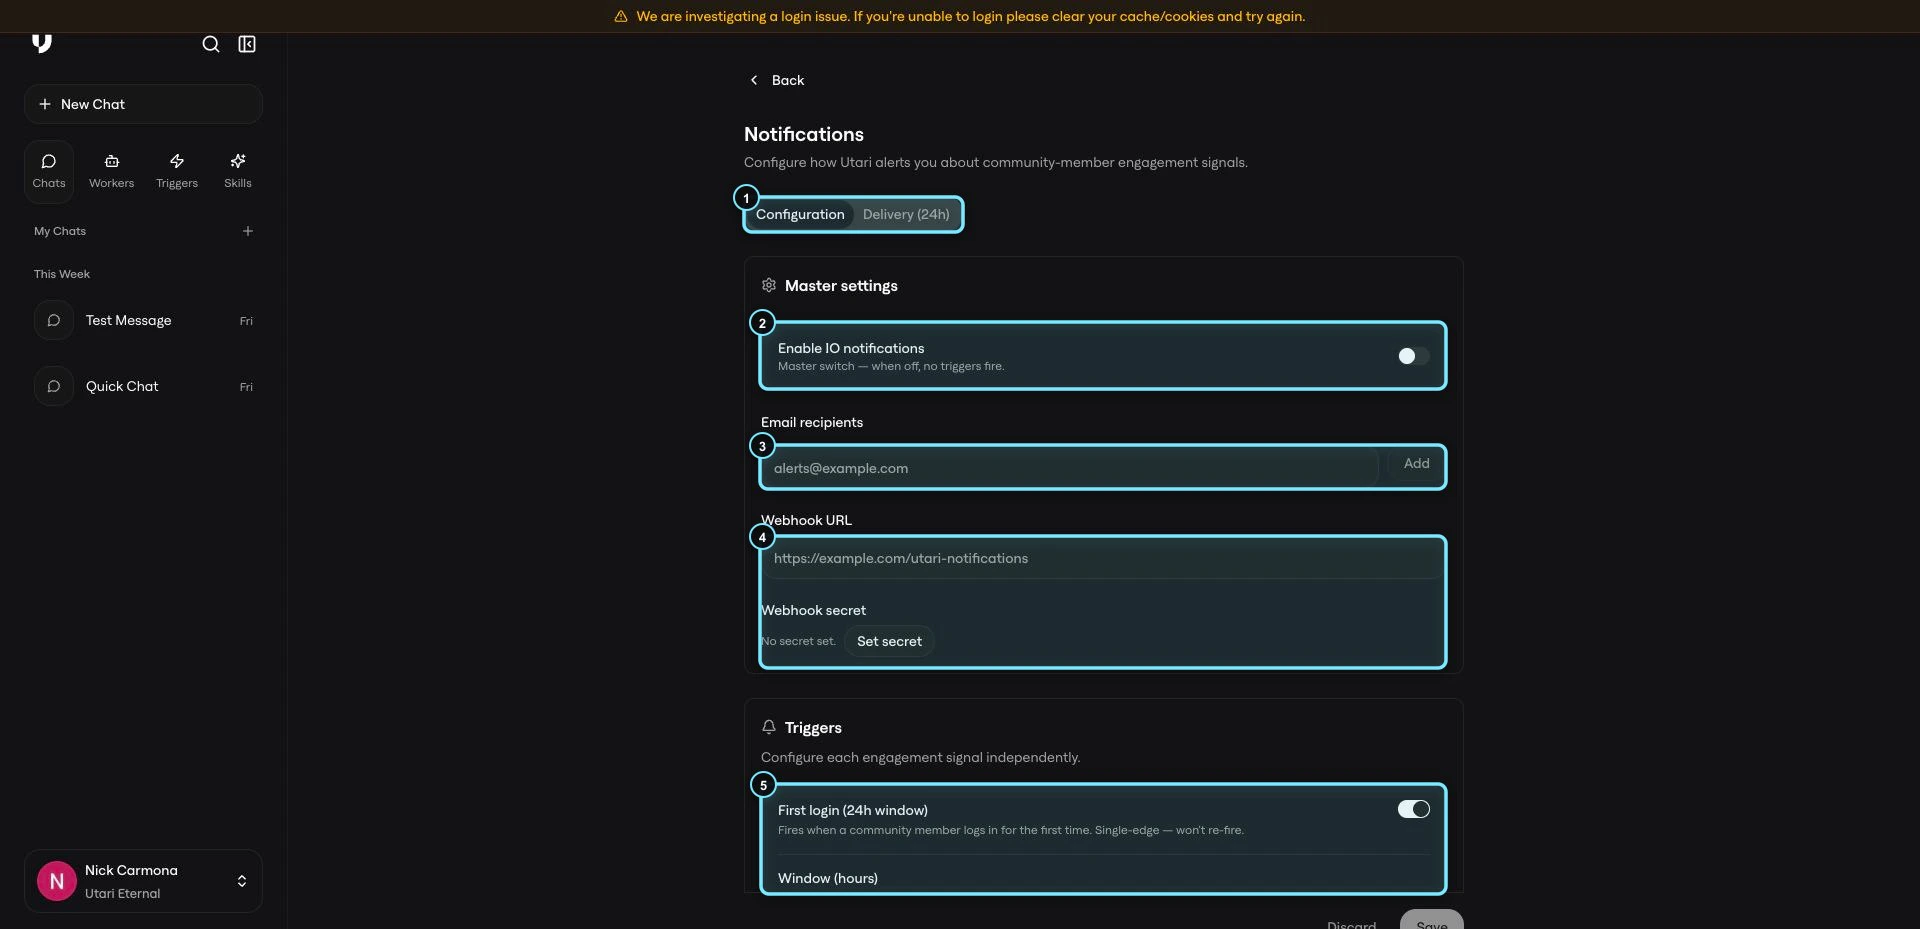
- Turn on the master notifications switch when the owner is ready to receive alerts.
- Add email recipients deliberately.
- Add a webhook URL and secret only if notifications should go into another system.
- Review trigger rules.
- Turn on only the alerts the team will actually monitor.
- Save once the configuration is intentional.
Notifications: trigger rules
Use trigger rules to decide what should create an alert.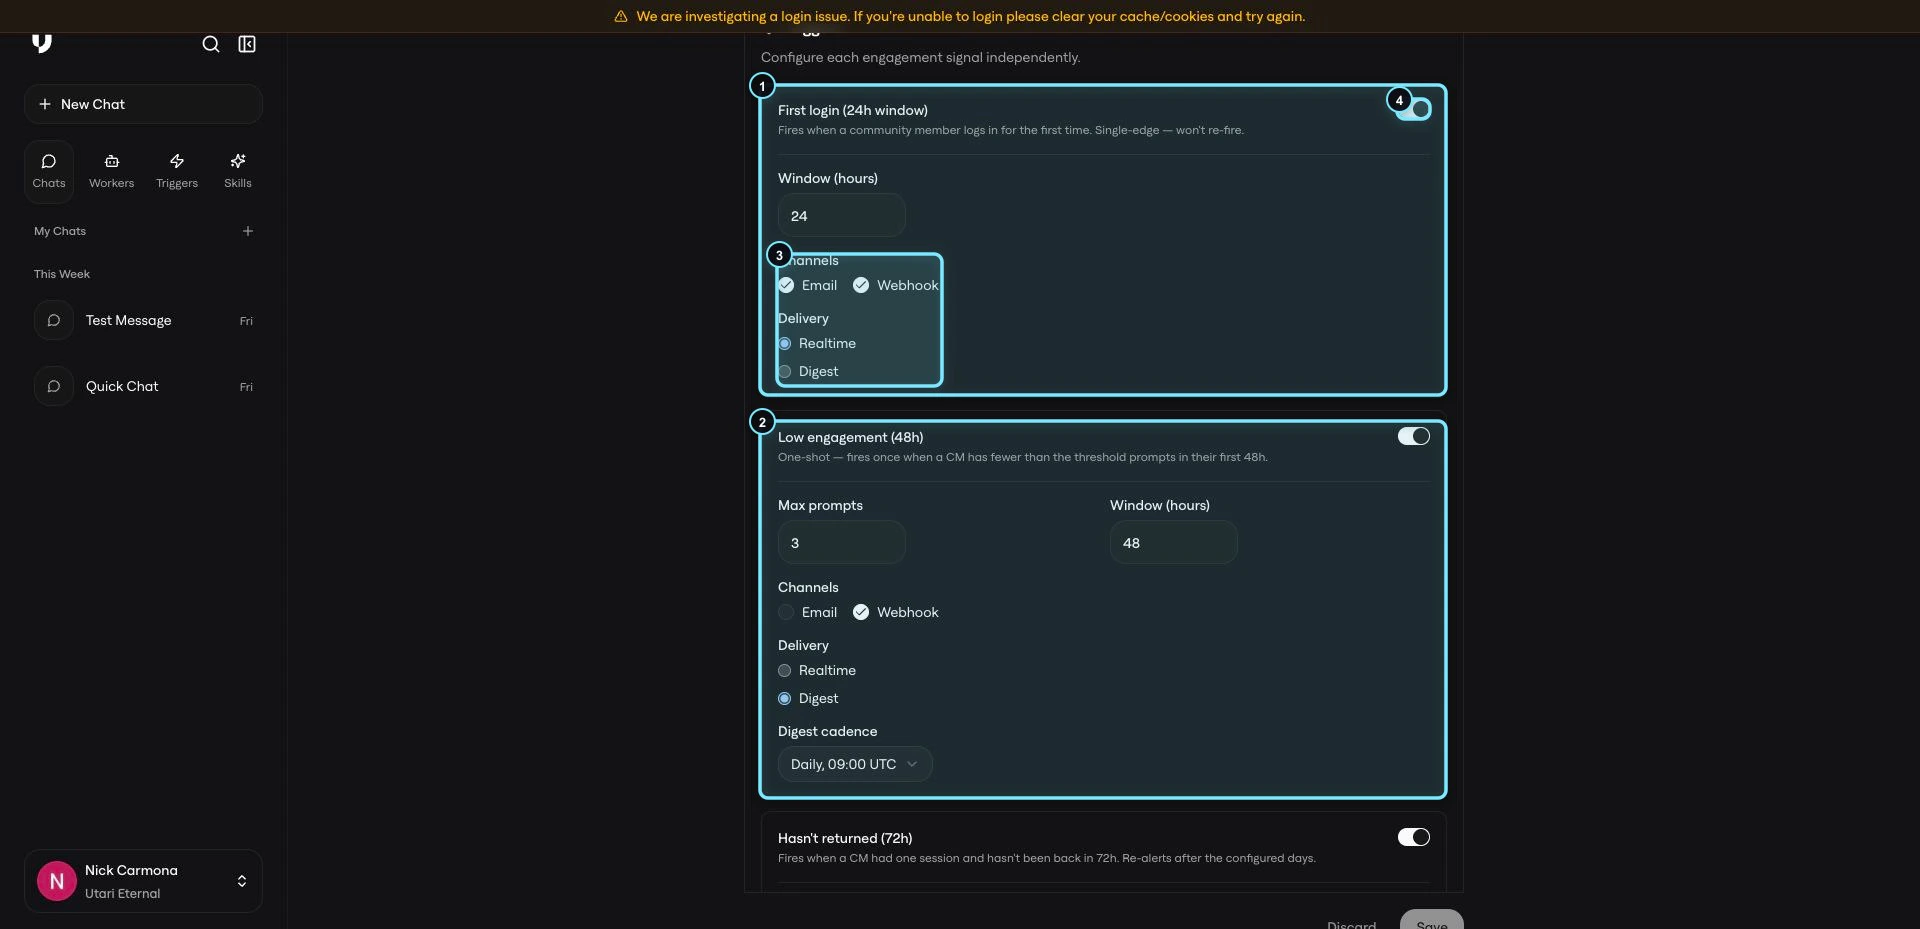
- First login
- Low engagement
- The event being monitored.
- Whether the alert goes to email, webhook, or both.
- Whether delivery is realtime or digest-based.
- The cadence if a digest is used.
Notifications: member health and test delivery
The lower notification sections can help the owner review member health alerts and test webhook delivery.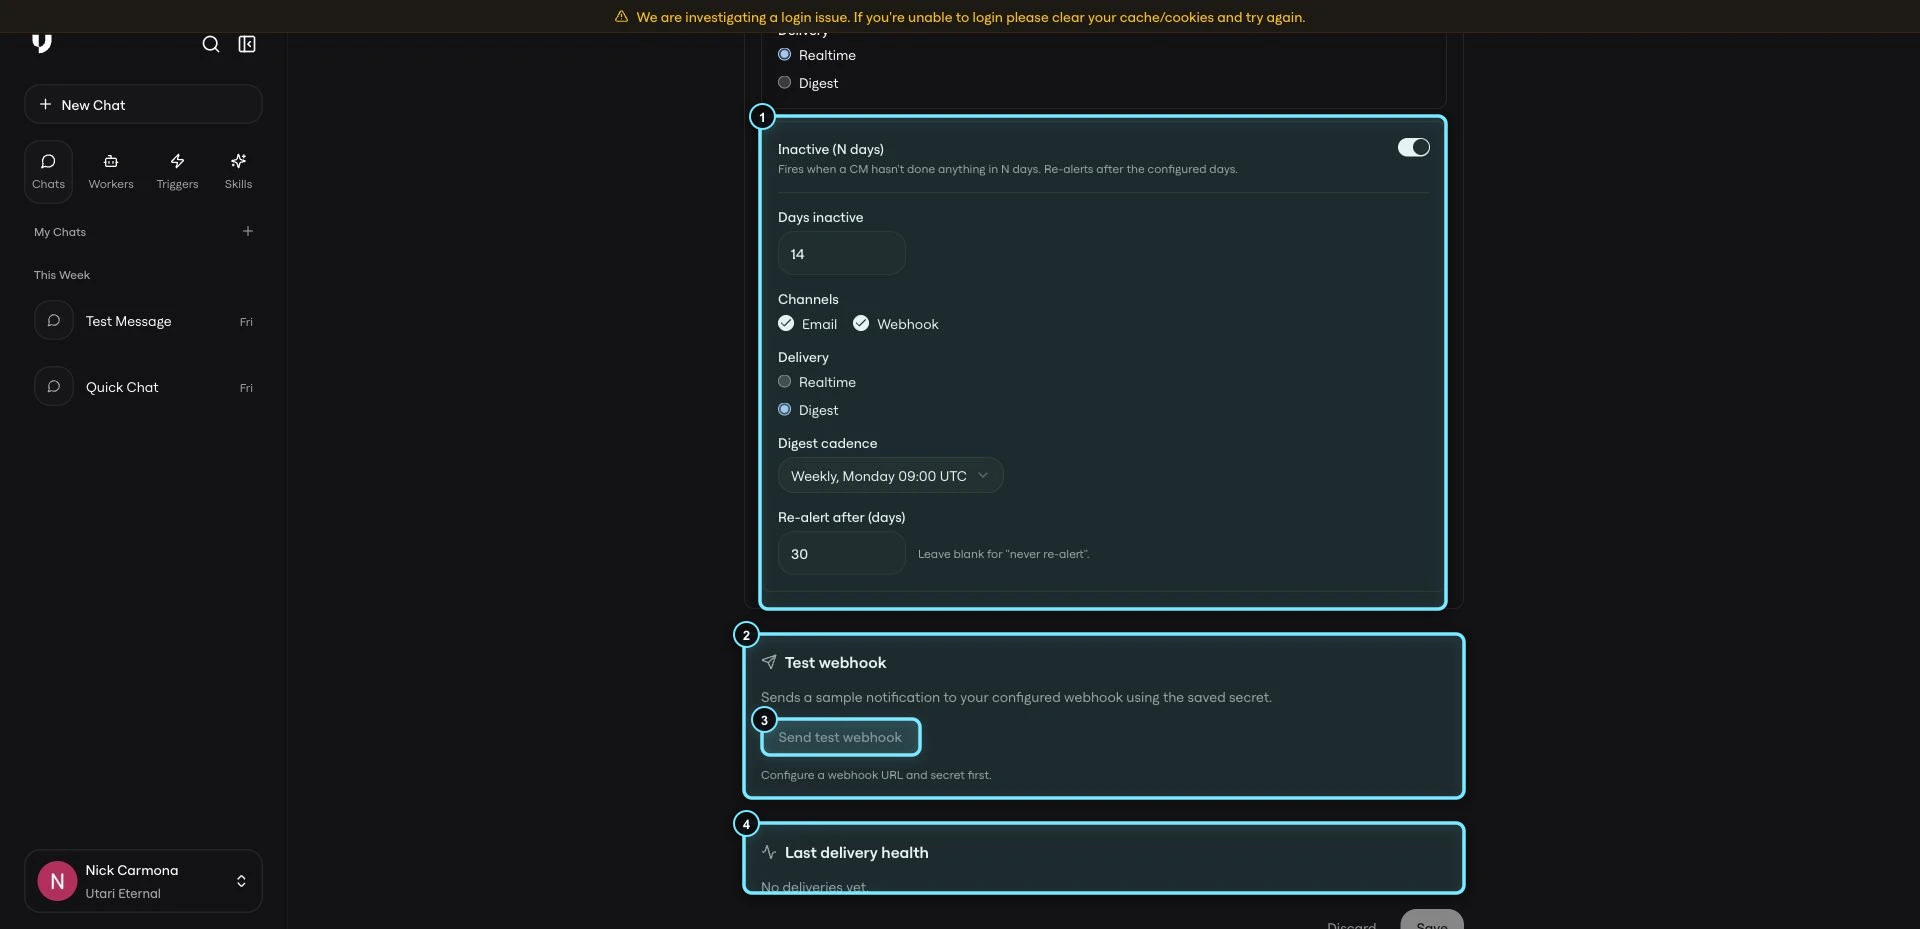
- Has not returned.
- Heavy use.
- Inactive.
Notifications: delivery review
Use the Delivery area to audit recent notification activity.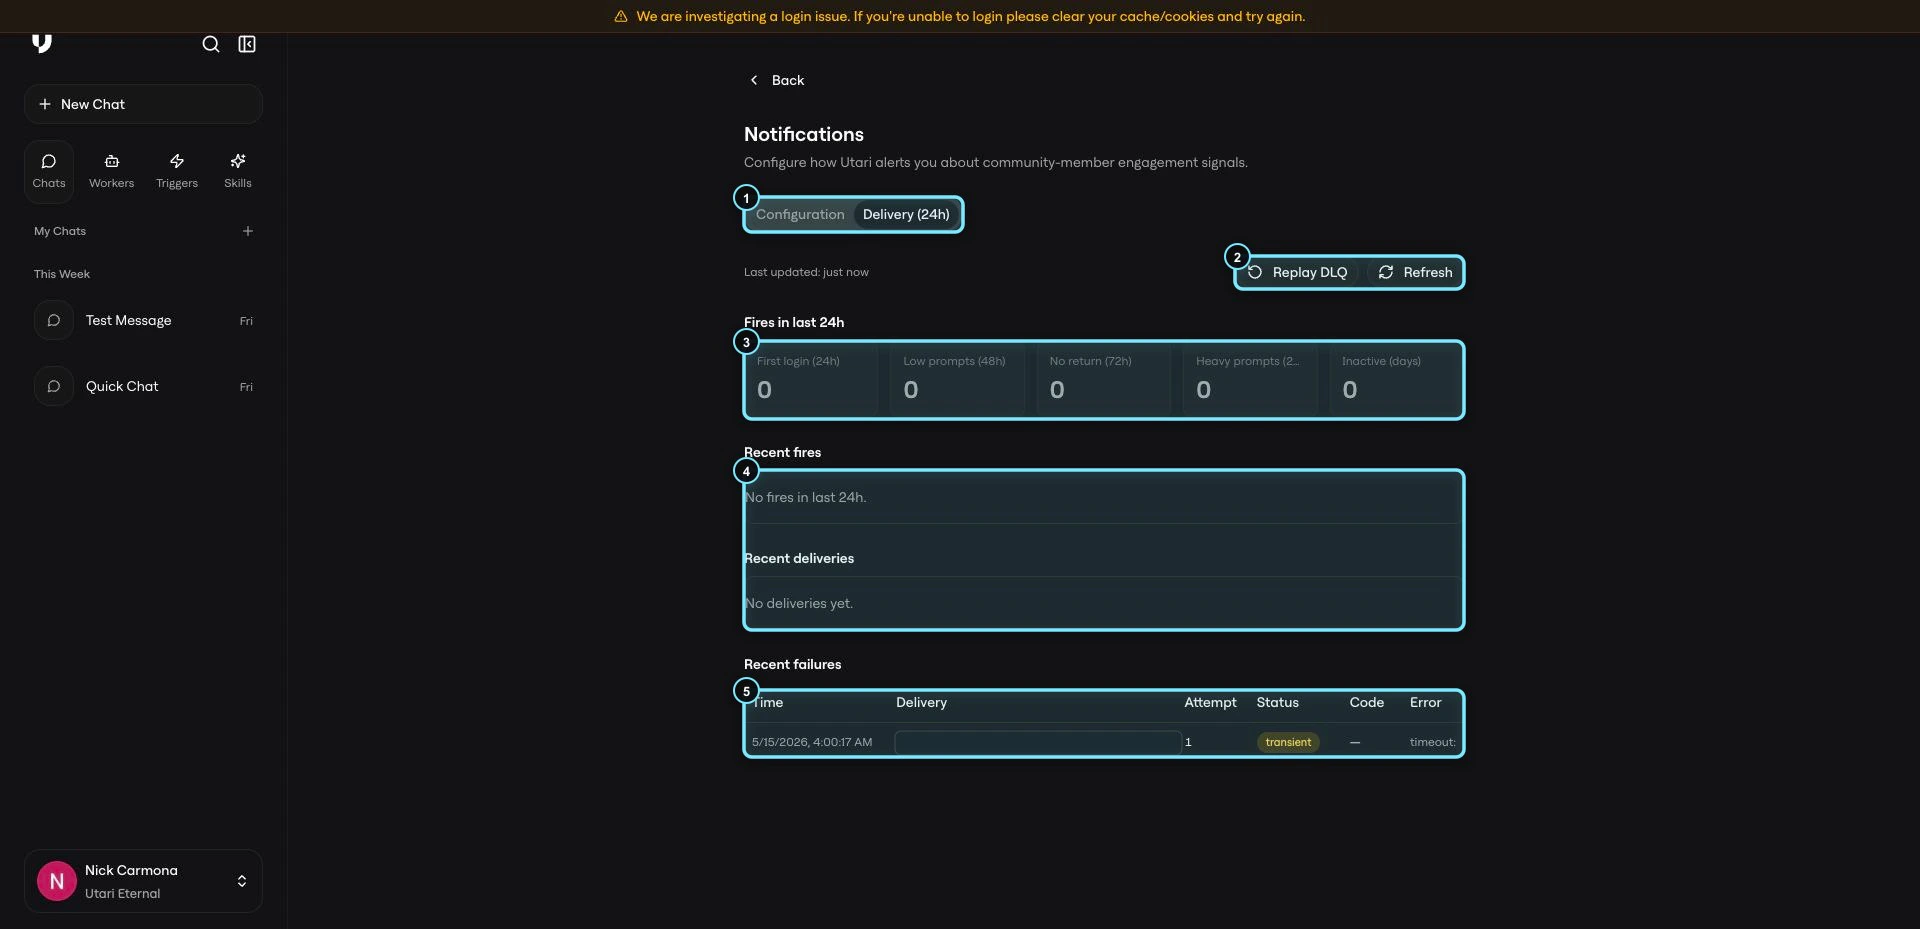
- Fires in the last 24 hours.
- Recent fires.
- Recent deliveries.
- Recent failures.
- Refresh and confirm the failure.
- Confirm notifications are enabled.
- Confirm the trigger is turned on.
- Confirm email recipients or webhook URL and secret are correct.
- If it is still unclear, email hey@utari.ai with the instance name, trigger, and failure details.
Decide the launch operating rhythm
Before launch, decide who owns each recurring responsibility. Assign clear owners for:- Access mode and member permissions.
- One-off invites.
- CSV imports.
- Invite resends.
- Member removals.
- Payment webhook setup and maintenance.
- Analytics review.
- Recent-query review.
- Knowledge base updates based on analytics.
- Notification recipients.
- Webhook setup and delivery health.
- Escalations to Utari.
- During the first launch window, check Members, Analytics, and Notifications daily.
- After the launch window, review Analytics and Recent Queries weekly.
- Review access settings and member lists whenever the offer, cohort, or community structure changes.
- Review notification delivery any time the owner expected an alert and did not receive it.
What to avoid
Do not leave access more open than intended. Do not allow members to create workers or triggers unless that matches how you want the instance managed. Do not share webhook secrets, signing secrets, or private member details with unapproved people. Do not connect Whop, Stripe, notification recipients, or webhooks unless someone owns the setup after launch. Do not ignore Recent Queries. They are one of the fastest ways to find missing knowledge, confusing onboarding, or member support patterns.Quick check
You are ready to move on when you can answer:- Which access mode should this instance use?
- Which member permissions should be on or off?
- Who can invite, import, resend, or remove members?
- Which payment webhooks need to be connected?
- Who checks Analytics and Recent Queries?
- What happens when Recent Queries show a knowledge gap?
- Who receives owner notifications?
- Which notification triggers are enabled for launch?
- Who monitors delivery failures?
- What gets escalated to Utari?